How to Stop Moss Between Patio Pavers for Good
Tired of moss growing back between your patio pavers? Learn the step-by-step process we use to clean, sand, and seal pavers so moss stays away for years.
How We Helped a Homeowner Finally Beat Moss Between Pavers
We recently got a call from a homeowner — let’s call her Carol — who was absolutely fed up with the moss between her patio pavers.
Every spring, Carol dragged out the power washer, blasted all the green away, and watched it grow right back because the patio had never been properly sanded or sealed. On top of that, she told me she was in her 70s and simply couldn’t handle the heavy sweeping, shoveling, and vibrating compactor work that paver sanding requires.
Her words stuck with me: “I’m tired of this growing back every year.” So we walked her through what actually stops moss long-term: deep cleaning, proper sanding, and a quality sealer applied in the right order.
If you’re in the same boat as Carol, here’s the same step-by-step approach we shared with her — the difference between a patio that looks good for a month and one that stays clean for years.
Why Moss Keeps Coming Back Between Pavers
First, it helps to understand what you’re fighting against. Moss doesn’t appear “out of nowhere” — it takes advantage of a few specific conditions:
- Moisture trapped in the joints and the pores of the pavers
- Shade, especially on the north side of a house or under trees
- Organic debris like dirt, dust, and decaying leaves that settle in the joints
- Unsealed, porous pavers that soak up water like a sponge
When you only power wash, you’re just removing what’s on the surface. The pores and joints are still open and damp — the perfect moss habitat. That’s why we told Carol that the key is to clean deeply, refill the joints correctly, and then seal to lock things out.
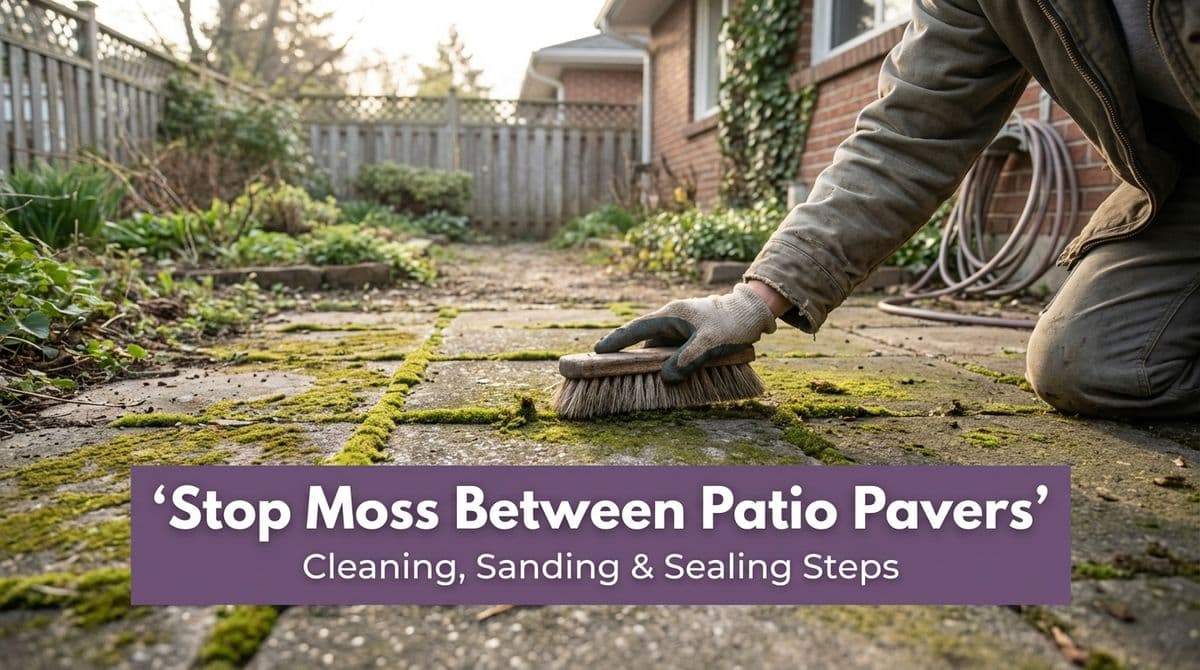
Step 1: Deep Clean the Pavers (The Right Way)
Carol was already doing one big thing right: cleaning before anything else. But a few small adjustments make a huge difference in how long the results last.
How to Clean Mossy Pavers
1. Start with a dry scrape. Before any water hits the patio, use a stiff broom, scraper, or joint brush to loosen and remove as much moss as possible. This cuts down on how much you have to blast out later.
2. Use a pressure washer carefully. We always caution homeowners: too much pressure, too close, and you’ll damage the pavers and wash out half the joint material. Aim for:
- A wide fan tip (not a pinpoint nozzle)
- 12–18 inches away from the surface
- Enough pressure to remove moss, not carve lines in the stone
3. Degrease and de-gunk. Moss isn’t the only thing in those pores. If you’ve had grills, planters, or vehicles nearby, there may be oil or organic stains. A paver-safe cleaner or mild detergent scrubbed in with a stiff brush helps lift what the power washer can’t reach.
4. Rinse thoroughly and let it dry. This is where patience pays off. We told Carol that the pavers need to be completely dry before sanding and sealing — usually 24–48 hours of dry weather. If there’s moisture left in the pores, it can interfere with both the sand and the sealer.
Step 2: Choose the Right Sand for the Joints
On our call, Carol mentioned she was thinking about “the sand that’s kind of like a concrete mix” so she didn’t have to keep redoing it every year. She was talking about polymeric sand, and that’s exactly what we often recommend.
Regular Joint Sand vs. Polymeric Sand
- Regular joint sand is just dry sand swept into the joints. It works, but it’s easily washed out by heavy rain or power washing, and it doesn’t do much to discourage moss or weeds.
- Polymeric sand has special binders in it. Once it’s swept into the joints and then misted with water, it hardens (not as solid as concrete, but firm) and resists washout, weeds, and moss.
For homeowners who are tired of redoing joints every year like Carol, polymeric sand is usually worth the extra cost and a bit more care in the installation.
Step 3: Install and Compact the Sand
Here’s where Carol ran into trouble: she could handle the prep work but couldn’t realistically sweep and vibrate sand into the joints herself. And she was right to be concerned — proper compaction makes or breaks this step.
How We Sand Paver Joints
1. Check that the patio is bone-dry. Any moisture in the joints can cause polymeric sand to clump instead of flowing in evenly.
2. Spread the sand. We pour small amounts of sand onto the surface and use a stiff broom to sweep it diagonally across the joints. The goal is to fill them completely, top to bottom.
3. Vibrate the sand into place. On the call, we explained that the sand “should be vibrated in” with a plate compactor. This vibration:
- Settles the sand densely into the joints
- Prevents future sinking and empty gaps
- Helps the sand lock together more effectively
4. Top off the joints. After compacting, we add more sand and sweep again. Joints often drop a bit after vibration, so we refill them to just below the chamfer (the little beveled edge) of the paver.
5. Clean the surface thoroughly. Before you ever add water to polymeric sand, every bit of dust must be swept or blown off the paver surface. If not, it can harden into a hazy film.
6. Lightly mist to activate. Follow the product’s instructions and lightly mist the patio. More water is not better — you want to activate the binders, not wash them out of the joints.
Step 4: Seal the Pavers to Block Moss and Stains
This was the missing piece for Carol’s patio. As we explained to her, a good paver sealer is both protective and somewhat antimicrobial, and it fills in those tiny pores where moss likes to grab hold.
Why Sealing Makes Such a Difference
A quality paver sealer will:
- Reduce moisture absorption so pavers dry out faster after rain
- Make moss and algae less likely to take hold
- Protect against stains from leaves, food, and grills
- Enhance color (depending on whether you choose a natural or “wet look” finish)
We always stress two things, just like we did with Carol:
- The surface must be deep cleaned first and fully dry so the sealer can soak into the paver.
- You should follow the manufacturer’s coverage and curing times carefully for best results.
Simple Ongoing Tips to Keep Moss Away
Once your patio is cleaned, sanded, and sealed, the hard work is done. To keep moss from coming back:
- Blow or sweep debris regularly so leaves and dirt don’t build up in the joints.
- Trim back overhanging branches to let in more sun and air.
- Spot treat early moss with a gentle, paver-safe moss killer instead of waiting until it’s thick.
- Re-seal every few years as recommended by the sealer manufacturer.
When to Bring in a Pro
Some homeowners are comfortable doing everything themselves. Others, like Carol, are happy to handle the light prep but need help with the heavy, technical parts — especially vibrating in the sand and applying sealer evenly.
If you’re worried about damaging your pavers with a pressure washer, unsure about polymeric sand, or simply can’t manage the physical labor, that’s exactly when it makes sense to call in a professional crew. We can usually give you guidance from a few photos first, then step in for the sanding, compacting, and sealing so you’re not out there battling moss again next year.
The bottom line: when you combine thorough cleaning, proper sanding, and a quality sealer, you turn a moss magnet of a patio into a low-maintenance outdoor space you can enjoy — without the yearly power-washing ritual.