Designing Ideal Patio Steps for a Sliding Door
Learn how to design safe, comfortable patio steps at sliding doors, from ideal riser and tread dimensions to overhangs, finishes, and simple maintenance tips.
When a Patio Step Feels Too Shallow
We recently got a call from a customer — let’s call him Brian — who was standing at his new sliding door trying to picture how the finished patio step would feel underfoot.
Our crew had poured the concrete core for a small step outside his back slider. Looking at it mid-construction, Brian worried it felt a little too shallow front-to-back. As he put it, he was afraid his “foot would kind of come off the edge” stepping out of the house.
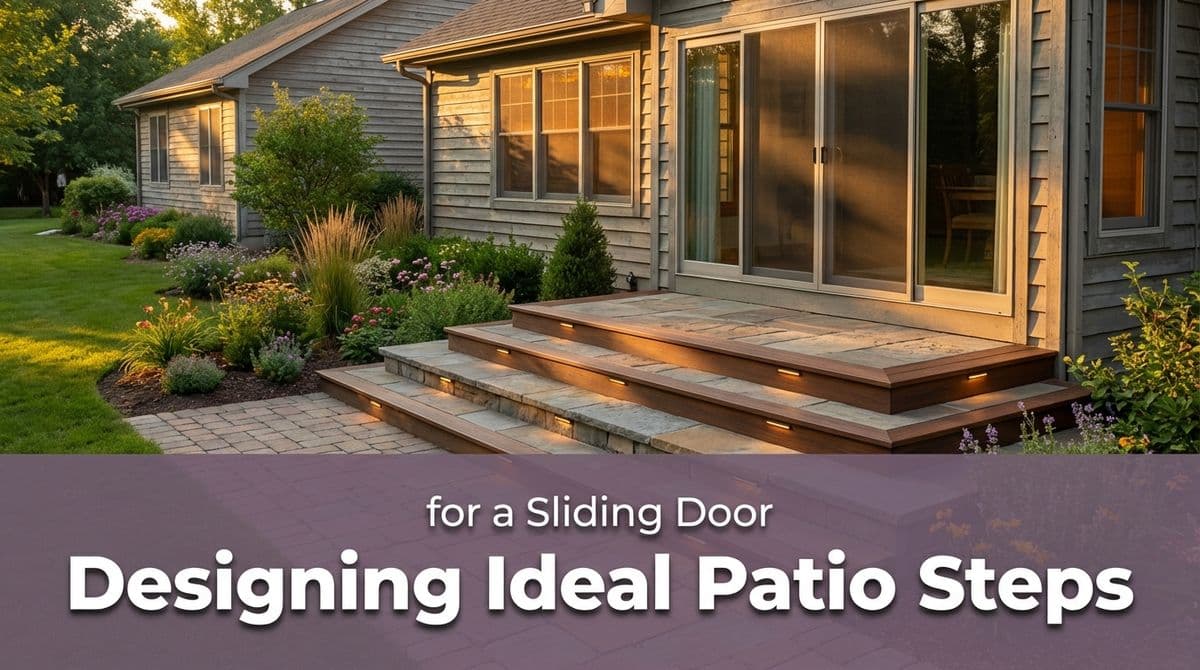
On the phone, we walked him through what he was seeing: that concrete pad was just the interior core. The finished step would be built out with stone on the face and tread, making it both deeper and slightly taller than what he was seeing that day.
Core, Stone Skin, and Overhang: How a Finished Step Comes Together
With Brian, we explained that the concrete was essentially the structural base, and the “pretty part” was still to come. That’s typical for a patio step at a sliding door:
- Concrete core: Poured slightly smaller than the final dimensions for strength and stability.
- Stone face: Usually about 1" thick, applied to the vertical riser.
- Stone tread (top): Another 1–2" thick, creating the walking surface and the overhang.
In Brian’s case, we told him the finished step would be about 2" deeper and 2" wider overall than the core he was seeing. One inch of that was the vertical face stone, and another inch was the tread overhang — the part your toes feel as you step down.
That extra depth makes a big difference in comfort and confidence when you’re stepping out with an armful of groceries, a dog on a leash, or kids darting around your legs.
Ideal Dimensions for Patio Steps at Sliding Doors
Every home is a little different, but there are some general guidelines we follow to make steps safe and comfortable:
- Riser height (step up/down): We typically target around 6.5–7.25" from the interior floor to the top of the step, and from the step down to the patio. Local codes often cap residential risers around 7.75".
- Tread depth (front to back): We like 11–12" of usable depth on that first step outside a sliding door so your whole foot lands solidly.
- Overhang: A 1"–1.25" overhang is usually enough to look finished and feel comfortable without creating a tripping edge.
- Width: We almost always extend the step at least a few inches beyond each side of the sliding door, sometimes the full width of the patio door wall for a more generous landing.
With Brian, his concern about “shallow” footing went away once he understood we’d be adding that extra 2" in depth and the 1"–2" of coping overhang on top of the concrete.
Safety, Codes, and Accessibility at the Doorway
Beyond comfort, we also look at building codes and accessibility when we design these steps. Local codes usually require that each riser be close in height to the next — often within about 3/8" of each other. That’s why we measure carefully from the finished interior floor down to the finished patio level and then divide that distance into even steps.
If you or a family member has mobility issues, we can also:
- Lower the riser height slightly for easier stepping.
- Widen the landing so there’s room for a walker or for turning before stepping down.
- Plan the patio slope and surface so it can accommodate a future ramp if needed.
For some homes, instead of a step we build an almost flush transition with a very gentle slope in the patio, which can be more accessible while still draining water away from the house.
Choosing Finishes: Stone, Concrete, and Slip Resistance
Brian’s step, like many we build, was going to be “skinned” with stone — a stone face and a stone tread on top of the concrete core. That gives you the strength of concrete with the look and feel of natural or manufactured stone.
When we talk finish options with homeowners, we usually cover:
- Natural stone treads: Bluestone, limestone, or sandstone with a thermal or brushed finish for grip.
- Paver caps: Manufactured caps that match or complement the main patio pavers.
- Stamped or broom-finished concrete: If you prefer a simpler all-concrete look, we use a broom or textured finish to reduce slipperiness.
For any finish, we avoid highly polished surfaces at exterior steps. A little texture is your friend when those steps get wet, icy, or dusty.
Maintenance Tips for Long-Lasting Patio Steps
Once the step looks right and feels right, the next question is how to keep it that way. We usually recommend homeowners:
- Clean gently but regularly: A soft broom and occasional hose-down keep grit from acting like sandpaper on the surface.
- Use the right de-icer: On stone and concrete, avoid harsh chemical de-icers when possible. Calcium magnesium acetate or sand is often safer than rock salt.
- Reseal when needed: Depending on the stone or concrete finish, a quality sealer every few years can help resist stains and freeze-thaw damage.
- Watch the joints: If you see mortar or joint sand washing out around the step, it’s worth a quick repair before water finds its way under the tread.
These small habits help that beautiful step at your sliding door stay stable and attractive for many seasons.
Planning Your Own Sliding Door Step
Brian felt a lot better once he knew what the finished dimensions and overhang would be and understood that the “short” step he was looking at was just the core. By the next day, once we had the main stone on, he could see — and feel — the final proportions.
If you’re looking at your own patio project and wondering whether that step will feel too shallow, too high, or just “off,” that’s exactly the kind of question we want you to ask. We’re happy to walk you through:
- How high the risers will be from inside to outside.
- How deep and wide the landing will feel underfoot.
- What overhang, stone, or paver detail will work best for your home.
With the right dimensions, overhang, and finish, that first step out your sliding door can be one of the safest — and nicest looking — spots on your entire patio.